Showing posts with label DIY. Show all posts

1/20/12

Eco Love: Make Your Own Dishwasher Soap

For your pleasure, another dose of earthsaving (and pocketbook pleasing) eco-love.  Today, learn how to make your own dishwashing detergent for just under $0.05 a load.  Yes, you read correctly.  Five cents.  It only takes a few ingredients:
-Vinegar
-Borax
-Oxi-Clean (or another inexpensive active detergent)
-Baking Soda (or washing powder)


I keep all of my basic cleaning products in labeled glass jars so they are always ready for mixing.

Making a batch of detergent is easy:
  1. Mix equal parts baking soda and borax.  Typically, adding a cup at time until you have the desired sized batch works well.  In the nest, we make batches of two cups each soda and borax.
  2. Add another equal part of your active detergent (Oxi-clean works best) and mix again.
  3. Store your mix in a well labeled sealible container.
  4. If you have hard water and/or you're concerned about spotting, add two tablespoons of white vinegar to the "finishing liquid" hole in your dishwasher.
To use, simply add two tablespoons of your mix to the dishwasher, along with the vinegar if desired.

The mix should run for about a month's worth of loads (if you cook as much as sparrow!).

Thats all!


This receipe was originally spotted at thesimpledollar , then modifed by paper sparrow.

8/10/11

Eco Love: Making Laundry Detergent from Scratch

I recently came across a fabulous idea via Pinterest, making laundry soap from simple household ingredients.  Its easier on the planet and your pocketbook (at under $4 for over 500 loads).  With out further ado, here's the process.
You'll Need:
-1 half bar of your favorite soap
-1 cup borax
-1 cup washing soda
-2 gallons water
-1 12 quart pot
-essential oils (if you like)
-long spoon
-cheese grater
-a 2+ gallon container

Start by grating your half bar of soap into your massive pot. I chose a wonderful goat soap that smells like cookies.  Note: you may add an entire bar of soap if you like a much much thicker detergent.  A half bar makes it very easy to pour.  Add one gallon (16 cups) of water to boil.  Stir often until the soap flakes dissolve.
Next, add the borax and washing soda, stirring thoroughly.  Add several drops of essential oil if you want a yummy smell.  I added tea tree oil. peppermint and lavender.  Let the mix boil up and keep stirring (watch for overflow!).
The mix will thicken slightly during the boil, but will likely not thicken much more for another 24 hours.  after boiling for 3-4 minutes, remove pot and place in the sink.  Add one gallon of cold water.  Continue stirring.  
Let the mix cool in the sink until you can safely pour it into your containers.  I used a 3 gallon water dispenser.  Once placed in the laundry closet, the tap empties directly into the washer!
Ta-Da!  The entire process took only one hour and six laundry loads later, no complaints!  The mix doesn't sud much but still cleans great.


8/2/11

Inspiration From Pinterest

Like 95% of American Crafters, I have a slight Pinterest Addiction.  Every morning in the nest, first thing up on the computer is my Pinterest page.  Yesterday I had a burst of Pinterest-inspired creativity.  I spotted a groovy jewelry hanger using, wouldn't you know it, a painted picture frame and some sticks.  I thought, "Why not?".  So here it is, my new necklace display.

All you need is a couple painted picture frames (fortunately, I had a few on hand), some sturdy branches, twine or strong string, and plently of hot glue.


Flip your frame(s) over and fit three or so sticks in the frame, trimming with shears.  Glue the sticks into the frame and let cool. 


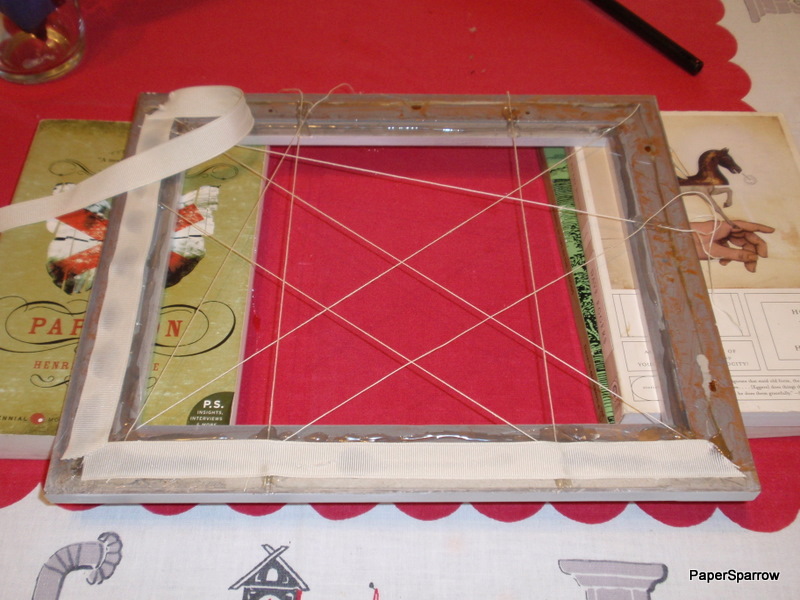
While that cooled down, I had another brain wave- a similar idea to hang my earrings (which always get seperated and lost).  I flipped another frame over and pulled out some crafting string, gluing them across the back "artistically".


To make sure the strings would stay in place, I glued down some spare ribbon over the ends and placed a natural sheet of paper across the back.


To finish things up, I fixed some ribbony bows and hung 'em.  Even Husband says they're pretty cute.  Thats a win.


The break down:

-two painted frames...free
-sticks...free
-ribbon...free
string...free
-hot glue...free

=free!

Not bad for and hour long project.

7/12/11

The Curious Case of Changing Colors

The fireplace was disagreeable. Unlikeable. Ugly. Especially after covering the walls with lovely shades of blue and green, the dark red tiles that had never been updated stuck out like dreadlocks at the Republican National Convention.

They had to go.

Seeing as the nest is rented… replacing, painting, re-grouting, or removing were not on the books. Fortunately, the use of removable adhesive vinyl is not taboo according to the rental agreement.

6 hours and 27 sheets of 12"x6" white sticky vinyl later.... it was 'bye bye barf' and 'hello, lovely'.

6/26/10

The Couch: Remastered

The back alley foundling couch is finished!


Before: 


I had already removed the NINE layers of fabric and the original stuffing, which for all accounts was completely nasty.  Notice the barf green paint on the wood.  The stuffing you see here is salvage foam and stuffing from a different couch we cannibalized and tossed.  Up-cyling!

After:


Ahhh.  SO much better.  I stripped off the green paint and replaced it with a matte black.


Notice the trendy Ikea fabric?  'Stuff White People Like' would be so proud.


The cushions?  Up-cycled foam, of course.

Triumph!

4/3/10

TOMS

I promised Miss Casey that I would post some pictures of my latest TOMS adventure.  For those of you who don't know what TOMS are, its a shoe company that gives away one pair of matching new shoes to a needy child for every pair that you buy.  I'm working on my fourth pair currently, and Tay has had five or six.  I stumbled onto them about four years ago and thought they'd make a great birthday present for Tay.  I bought a white pair and decorated them with Tay's favorite writers. 


So there you have it, the begining of our TOMS craze. 

I wore my last pair, a lovely gift form my brothers in law, into the ground.  For my birthday I bought myself a new white pair to mark up.  We're hearing to Florida for a week's vacation and I wanted a sparkly new pair to break in.  So I did a little rush job and finished them yesterday.

Thats a bird on the left and a kitten on the right.  You'll notice the kitten is thinking of the bird and the bird is thinking of scribbles.
Tada!  Let the Florida fun begin!

3/29/10

To Try or Not to Try

Just stumbled on this beauty over at creature comfort's blog.

Take a peek.

2/24/10

The Updated Apartment Tour


The Updated Apartment Tour from Courtney Walling on Vimeo.

I've been busy while the Husband is in Kenya.   Bored much?

1/21/10

Its Curtains for You


I've received word that my father-in-law is going to visiting our little slice of heaven in less than a week. You know what that means...we have to make it look like adults actually live here. I'm now attempting to finish (or at least partially finish) as many home improvement projects as possible. I can't get them all done, but I figure I can choose a few from the list:


-recovering the up-cycled loveseat.

-painting the bathroom

-recovering all the old throw pillows

-framing fabric (more on this one later)

-painting details on the huge storage chest, coffee table and rocker in the living room

-sanding/staining the bathroom medicine chest


So much to do with little time. I figure the two most pressing jobs first, that is the couch and painting the bathroom. The loveseat is pretty important as it is the only thing to sit on in the living room. And the bathroom? Well, its just gross. You'll just have to tune in later to see who wins out.


---


I completed a project today, actually.


We have groovy french doors that separate the britchen and living room. My only complaint about these awesome vintage doors is the lack of privacy, that is, the glass is completely uncovered. Putting curtains on these babies would be complicated (i.e. drilling, placing rods, finding curtains to fit) and pricey. Instead, I went the cost effective/visually simple route, my old friend paper.


I picked up this trick, believe it or not in bible school. I was seven and it was Christmas. Our bible school teacher had us make stained glass ornaments from oiled butcher paper. Flash forward to my high school years and I was re-creating 15th century European cathedral stained glass on my bedroom windows. My tools? Oil and colored crepe paper. I discovered if you oiled a window and simply applied the paper shapes to it, the paper would create a semi permanent and opque bond to the glass. Beautiful.


There is a distinct lack of views from our first floor apartment, that is from the bottom panes, anyway. So I've covered the bottom panes of our back windows in white geometric patterns using white crepe paper. The effect in the daytime is a pleasing creamy wash of light, while in the night time, the patterns really standout. Using a water-glue concoction I can layer paper as many times as I want.


I've done the same to our lovely french doors. Take a look:


Before:


After:

9/28/09

Programs....Check.

Finally finished the programs (or finished my end of the deal anyway).

To save on costs AND ensure extra awesome-ness, Mom and I went with this idea (which isn't mine at all, and is completely stolen):


They are paperboard CD cases with velum/paper inserts for the program.  Cool eh?

We began our programs with creating a stamp image to emboss on the front (I did it all by myself, thankyou).  I then punched each case and inserted eyelets into each spine.


We then embossed 200 CD cases, which took FOREVER, but was completely worth it.


From there, I printed a velum coversheet and inner paper inserts for each program, also punched twice for spine.


Finally, I strung teal ribbon through the holes and topped it all off with a bow.


Next, Tay's fam will print CD's of our original music to insert in each case slot. 

Love it. 

I love it even more now that its done.

7/11/09

Coming Soon...

Finished Boutonnieres.